REAL SOCIEDAD FEMENINO 21/22 – TACTICAL ANALYSIS

We often speak about the competitive nature of teams in different leagues in Europe. There is this strange idea that most leagues aren’t really competitive by nature, and I think that’s a rather arrogant view of looking at it. I think this has been said a lot about the Spanish league and I think there’s no real truth in it.

Barcelona obviously is a very good side, but what fascinated me in Spain were the three teams fighting for UWCL spots: Real Madrid, Atletico Madrid, and Real Sociedad. In this tactical analysis piece, I will look closely to the latter – as they finished second in the Primera Ibedrola with six points more than number three Real Madrid. They now will face Bayern München for a place in the UWCL group stages.

Context

Real Sociedad have been present in the Real Sociedad for quite some time now and the last season can be seen as a great development from recent seasons. In 18/19 they became 7th, in 19/20 they became 6th and in 20/21 they became 5th. Every year they tried and achieved a better ranking on the table than the year before. Their aim was to grow into the higher rankings of the league and they did that, but in this analysis, we will look into the tactics and see how second place was achieved.

Formation

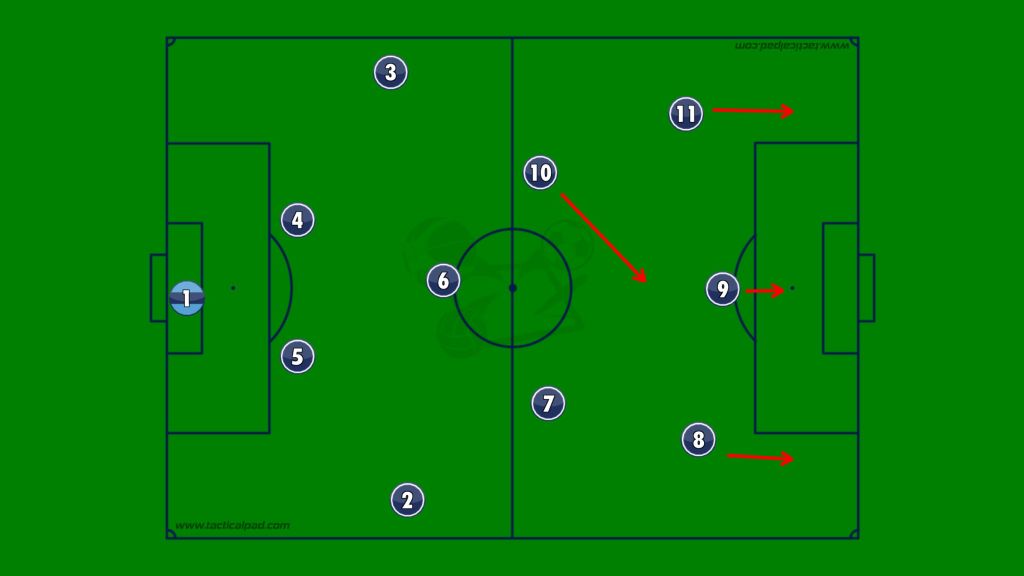
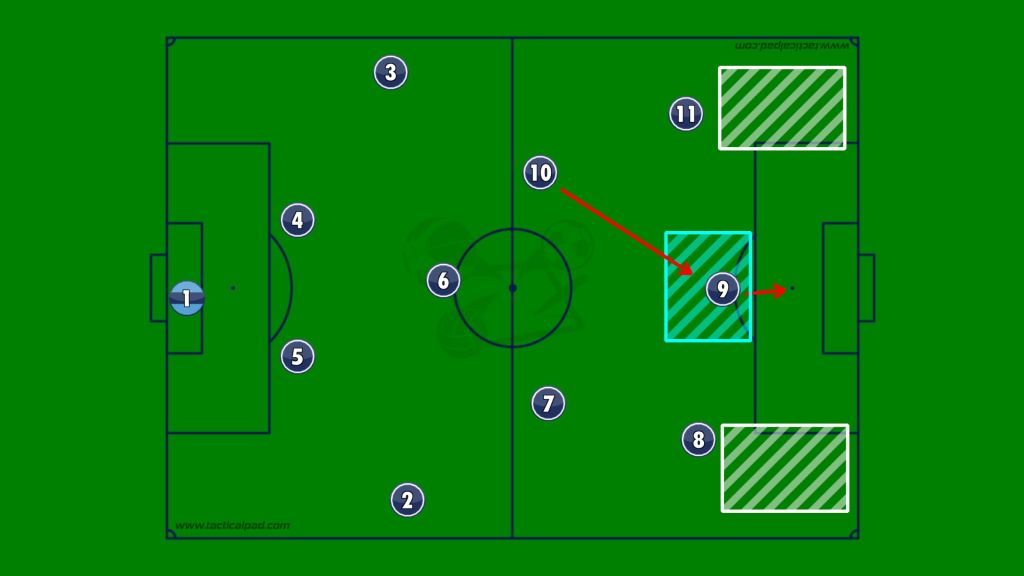
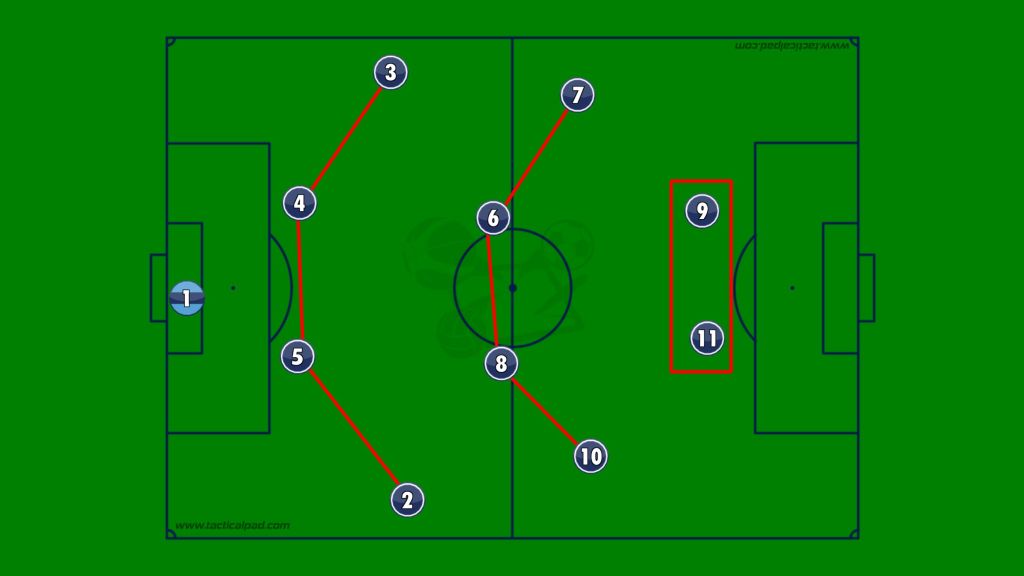
The two most used formations by La Real were the 4-1-4-1 and the 4-3-3. In the last few games, the formations looked like this on paper:

For the majority of the games, Sociedad played with a 4-1-4-1, and their aim was to have sufficient defensive coverage in case of a counter-attack, but still have a high-tempo ball movement with their four-woman midfield. The back line consists of Nuria Rabano on left back, Vanegas and Etxezarreta as the central defensive duo, and Poljak on the right back position. This doesn’t change throughout the formations. Torre plays as the deepest midfielder or defensive midfielder. Her role in the 4-1-4-1 is more defensively and acts as the connection between defence and midfield, in the 4-3-3 she moves up the pitch and is more involved with the passes going forward.

Another constant in midfield is Gili on the left central midfield position, but the right position changes. Eizaguirre or Garcia play there – but with Eizaguirre, it’s never really certain where she will play. She can play on the right and the left in midfield – centrally and wide – but also in the attack as a winger or even as a striker. Her versatility is a huge asset to this squad. Franssi always plays as the lone striker and Sarriegi is a versatile wide midfielder/striker who can play on both wings, as well in midfield as in the attack.

4-3-3 formation Real Sociedad vs Madrid CF

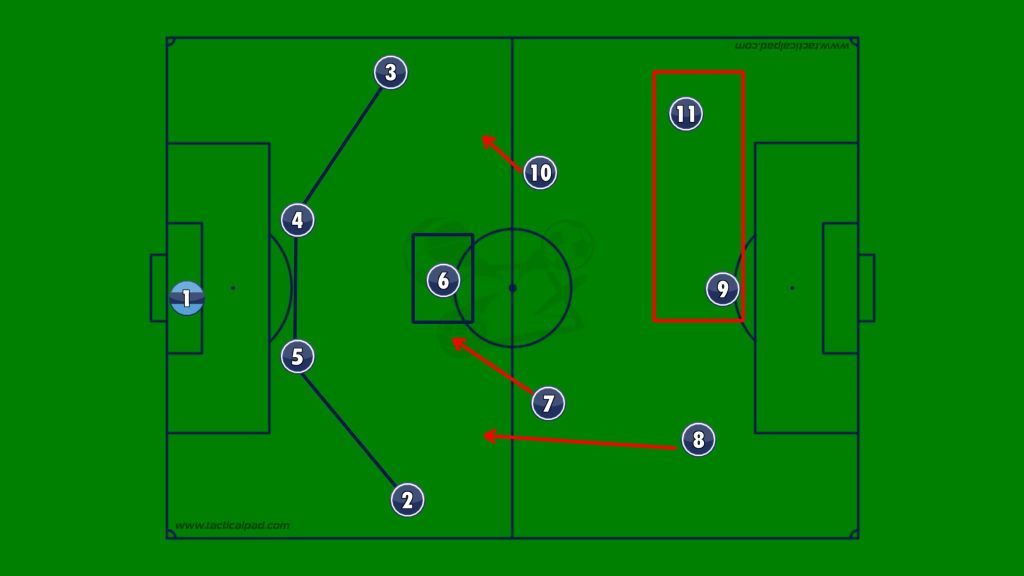
As often argued, a formation is just a starting point to start a game or re-start after a certain development, but in the image above you can see that even in the 4-3-3 – Torre will play deeper. In fact, she plays on the same level as the full backs, which gives an interesting 3-2 dynamic for the defensive players.

Build-up and attacking play

Real Sociedad are calm on the ball, especially when building up from the back. The goalkeeper has the role of acting as the 5th passing defender and is actively engaged in the build-up. The key to building up is to pass the ball at a high tempo and pace, to create space elsewhere on the pitch.

Next to that they want to pass the ball quickly in the defensive third, but be more passive and patient with it in the middle third – they focus on carrying the ball there and dragging players out of their position in the process.

By combining these two things, they try to create space in the final third, which can be triggered by one through pass or key pass.

In the video above you can see how La Real do this against Rayo Vallecano. They use the passing, the movements to drag players out of their position and the decisive pass by Eizaguiire sets Franssi up for a goalscoring opportunity.

In the video above we see Real Sociedad in their game against Madrid CF, playing from right to left. What they do here is that the full backs go higher up the pitch, leaving the two central defenders alone with the goalkeeper. What creates more space is the fact that Torre drops down between the two central defenders. This meant that Madrid needed to follow through with their marking and opening up space in the defensive lines. Left back Nuria Rabano recognised that and recognised the run behind the defence, and provided the long ball that give way to another 1v1 with the goalkeeper.

When they get pressed high and don’t have the luxury of time on their hand, they need to revert to other measures. In the game against Sevilla, we see an aggressive press in the attacking third and middle third from Sevilla’s perspective. The preferred passing game can’t be played and therefore they revert to the long ball.

The long ball is played into the attacking midfielders who aren’t only technically gifted, but also have a physical presence that allows them to win (aerial) duels, control the ball and pass it forward to the striker(s). In winning the ball, passing it forward, and giving the through ball – from the long ball – they are set up in a 1v1, as you have seen in the video above.

Defensive style of play

In the defensive side of the game, Real Sociedad need to react and like to have two lines of defence. This can be a 4-5-1 without the ball or even a 5-3-2 without the ball, depending on how deep Torre will drop between the central defenders.

Torre drops deep between the central defenders, effectively making a back-three. The full backs complete the back-five or a 3-4-1-2, depending on how they position themselves.

So how do they conduct themselves defensively? They want to make sure they always overload the opposition and limit them in their movement. They give room on the flanks because they have the conception that dominating the central zones is more important.

In this game against Sevilla, we see that Sevilla doesn’t find many passing options through the middle, but resort to looking for the wide areas with long balls. When they do that, La Real struggle to sufficiently deal with the attacks and concede goalscoring opportunities.

In the video above you can see what happens when the opposition tries to attack through the middle with a through ball. Initially, it seems dangerous, but because the central areas are marked very well and overloaded, the opposition has to go to the wide areas. Real Sociedad do really well to block passing lanes and in the end the opposition only has the option to shoot, which didn’t trouble the goalkeeper too much.

When they have a solid defensive line at the back and the opposition is doing their build-up, Real Sociedad do have a good way of dealing with the attacks.

Transition defence to attack

Another phase of play we can look at is the transition phase from defence to attack. How do Real Sociedad convert from a deep defensive formation to an attacking formation within a few seconds? As we have seen La Real used the defensive midfielder a lot in the defensive phases of the game and the midfield consisted of the attacking + central midfielders + wide players. As soon as they regain possession of the ball the striker goes higher and is a player to receive and hold the ball.

After that, she makes runs towards the flanks or remains in her position to give her teammates the time to progress up the pitch as well. This can be seen in a few examples of counter-attacking football employed by Real Sociedad.

In the video above you see Real Sociedad against Rayo Vallecano when Vallecano have the ball. Real Sociedad have six players behind the ball, with the whole midfield dropping deep as well, with Eizaguirre as the most progressive player. As soon as they intercept the ball they go into attacking mode.

Because of the high regain and the physicality of Eizaguirre, the team can progress quite easily into the middle third. Vallecano have seven players in the defensive lines, but Real Sociedad do have six going into that middle third and they can pose a real threat. Especially when Eizaguirre holds on to the ball and allows the wingers to make runs down the line. After the pass comes and the cross comes in the box, we see the strikers and the left winger attacking that cross – posing threat to a defence because of their pace and movement, not because of their numerical superiority.

In this counter-attack against Sevilla they conceded a corner first. It’s an interesting situation because as defence you play very deep, but the attacking side will be mostly in the penalty area too. Initially, they get the ball but aren’t quick with going forward and allowing the rest defence of Sevilla to re-group.

What’s interesting here is that on one hand the defender plays back to the goalkeeper who will kick it long into an area where no player is situated yet. Eizaguirre makes the run into that area, dragging defenders with her while she tries to create something. At the same time, she opens space for Franssi who was playing deeper, to go into and pose a threat to the Sevilla central defenders.

In the video above you can see Real Sociedad in their game against Eibar. Real Sociedad regain possession of the ball on the right side of the pitch and that’s also where the heavy marking is employed by Eibar. The pressure they want to put on Real Sociedad is aggressive, but La Real manages to surpass that by having high tempo passes and runners. You can see that the two runners on the left have a lot space to make their runs into.

Franssi passes the ball to Eizaguirre and after that, she goes into the striker position high on the pitch. Eizaguirre comes into the central zones and zone 14, while she allows space for her teammate to go into the left wide area and provide support from there. In the end, Eizaguirre carries the ball into the box and she is defended well, but these counter-attacks do give Real Sociedad strength in attack.

Transition attack to defence

Due to the attacking set up employed by La Real, they have to risk being exposed in a counter-attack in transition. This was very visible in their game against Madrid CF last season. What usually happens is that one central defender stays very deep, while the other central defenders form a two with Torre and the full backs are positioned high on the pitch together with the wingers.

In case of a counter-attack by the opposition, they can get caught on the break when the opposition is quick, has a higher number of runners going with the ball and the full backs aren’t fully cooperating.

This also happens in the first counter-attack against Madrid CF. A long ball comes into the middle third and initially, it looks dangerous for Real Sociedad before the attack is slowed down. The striker however doesn’t give up and holds the ball long enough to get support. This is where they can get hurt, as they aren’t always as focused in defence in case of a counter-attack; the defenders switch off when attacks are happen in the other side of the pitch and in defence they will make errors when pushed.

In the end it’s a 5v3 situation in and around the box, but even then Madrid CF come very close to a goal – thanking Leta for a good save.

They are sloppy in midfield at times and when playing against a direct opponent like Madrid CF, you will face threat from counter-attacks. One direct pass can disrupt the rest defence, but in this case no one is switched off and recover very quickly.

There aren’t options for the opposition and Real Sociedad have a numerical superiority in the final third of 8v4, which in the end makes it much easier to regain possession of the ball and eliminate the danger faced.

This particular thing with now being fast enough in recovery mode, can also be seen in this attack by Madrid CF. Even though this isn’t the highest pace counter-attack or most direct, they still are allowed a lot of spance on the left side as the right full back and right winger don’t really have the intensity to trail back.

In failing to do so, they allow the opposition to attack that side and invite threat into their defensive third. In the end they recover well with a sliding tackle, but the lack of intensity and defensive vision can cost them sometimes.

Creating goalscoring opportunities and scoring them

We have seen how they build and construct their attacking play, but how they convert that into goalscoring opportunities? In others words, how do they create shot opportunities close to the opposition’s goal? Let’s have a look.

In the game against Tenerife they managed to score a goal through actions through the middle. In going forward it’s important for the midfielders to be open to receive the ball and as the ball is played to them, the third-man runs are employed. In doing so, they can pass the ball directly into the dangerous areas and have an advantage. The opposition then needs to recover and as you see in the clip above, La Real exploits this very well and the defenders don’t know who or where to mark, leading to a simple tap in, in the end.

In the video above you can see Real Sociedad in their game against Rayo Vallecano where they scored a very exciting goal. They like to be dominant on the ball and pass it around as much as possible to stretch the defensive side.

As soon as the pressing is triggered by Vallecano, La Real manages to be flexible and move around a lot, chosing unexpected passing options. When they do so, it’s one or two touches before they reach another player and in doing so they use their personal skill to beat an opponent. Usually they would go higher up the pitch, but with Eizaguirre on the ball – she just has a fantastic striking technique and scores a great goal.

Another Eizaguirre goal from longe-range? Yes, it is. But it’s more about the way Real Sociedad press in the middle third to get the ball. It isn’t successful at first, but they keep at it and make life difficult for Sevilla in this particular clip. They make sure to block passing lanes, forcing decisions and when the oppositions want to turn – they recover the ball and have all eyes forward. A great piece of skill to score the goal, but the press in the middle third is what made this goal for Real Sociedad.

Real Sociedad can play through the middle and create chances there as we have seen in the videos above, but in this clip where they play Real Betis – we see a different form of utilising space in attafcks. They primarily focus on exploiting the space on the wings.

In this particular example, Nuria Rabano gets the ball from deep and holds it. As soon as she spots Gili, she combines with her and immediately goes into area in and around the box. Because of her good cross and passing, she delivers it brilliant on a platter for Kinden Jensen, who can easily finish.

Player to watch: Eizaguirre

Nuria Rabano left for Barcelona and was a vital player in their attacking set up, but Nerea Eizaguirre is the player that makes this Real Sociedad team tick.

As you can see in this video, with basically all her actions in attack – she is great on the ball and is strong. She can dribble and carry the ball into dangerous areas, provide the key pass or a long pass to a vital area and is always present in the right areas to attack the space as well.

She is in my opinion a great versatile player who can play in central midfield, attacking midfield, on both wings and can even play as a false 9 when required. When she is on the ball, something happens. She has this kind of magic on the ball which draws defenders to her and opens up soace for runs for her teammates – which she often can spot. Her numbers in goals and assists are impressive, and as you can see from her goals, she shows her shooting qualities in doing so.

Final thoughts

Real Sociedad had a great season and I think they have shown what they can do on the ball a lot. They have challenged the likes of Real Madrid and Atletico Madrid, and finished above them – securing a UWCL spot in which they will now feature against Bayern München.

It will be a tough match for La Real against the Bavarians, but they will pose a lot of threat on the ball for the Germans as well. We could see an exciting match up that will be hard fought out between the two sides. It’s also an example that not only Barcelona have a good team, but the quality of the Spanish league as a whole is good. And growing.

In terms of the league this year, it might be very hard for Real Sociedad to copy last year’s results. Real Madrid have very much strengthened their squad and Atletico Madrid will look for that UWCL spot as well. Losing Nuria to Barcelona is a big hole to fill, but the key principles, philosophy and tactics are still there. It wouldn’t surprise me if Real Sociedad will still be in and around those UWCL spots.

ERIK TEN HAG AT FC UTRECHT: AN ELITE COACH IN THE MAKING

With Erik ten Hag set to be appointed the next Manchester United manager, I thought it would be a good idea to look at Ten Hag’s experience in the Eredivisie. Now, everyone has looked at his Ajax tenure – rightly so. But, I wanted to focus on his period at FC Utrecht which shaped him into an elite manager.

In this article, I will look at three different aspects of what he achieved and changed while at FC Utrecht:

  1. Professionalism
  2. Transfers
  3. Tactics
  4. Final thoughts

Before I get into that I wanted to say that the data in this article are from Wyscout. Furthermore, it’s important to stress that FC Utrecht isn’t a small club in the Netherlands. They have won the Dutch Cup three times as well as the Supercup once. Their ambition is to consistently qualify for the European play-offs in the Eredivisie as well as pose a threat to the big 4 (Ajax, AZ, Feyenoord, PSV).

Ten Hag has moved into the top, step by step. His managerial career started at Go Ahead Eagles where he achieved promotion to the Eredivisie. After that, he went to Bavaria and coached Bayern München II, before he returned to the Netherlands and coached FC Utrecht. His experience in Germany and his ambition made sure FC Utrecht started to develop on and off the pitch.

PROFESSIONALISM

It’s a bit extreme to call FC Utrecht a sleeping giant, but there is a massive potential to get good results in the league. This doesn’t only depend on what happens on the pitch, but you need to create the right context and environment for professional athletes to thrive. So how did Ten Hag do that at FC Utrecht?

First of all, he changed the training quantity. The first team was required to train more than once per day and the intensity would be higher in the training sessions. With that notion, the club also would track what the players were eating as Ten Hag firmly believes that every aspect of professional life should be of high quality. This also translates into the analysis department of the club. It was instrumental for his way of preparing that he could see event data translated into analysis, so he could track the players’ movements, decision making and on-ball activity.

In addition to this, there also was the matter of the training grounds – especially the pitches. They were taken care of by the municipality, but this changed as Ten Hag wanted professional groundsmen and the control that the club took care of the grounds. All this feeds into the change of mentality Ten Hag wanted to achieve at FC Utrecht. With Ten Hag you need to have the mentality to win every game and even if you win games, you always have to be critical of your own performance.

TRANSFERS

Transfers 15/16

In the summer of 2015, Ten Hag became head coach of FC Utrecht and in his first season, we saw two distinct things. First, he cut a lot of dead weight. Players who were earning too much or just simply weren’t good enough. As you can see on the outgoing transfers, 15 players exited the club during the whole season, with 12 players leaving in the summer.

He did attract a few players who became instrumental like Strieder, Letschert and Haller. Now Haller was already on loan with Utrecht, so he can’t really take the credit for that. In regards to what English media have said about not giving youth a chance, that’s utter codswallop. Ramselaar, Amrabat and Joosten all were included in the squad.

Finished 11th in the 2014/2015 season, Ten Hag did really well in his first season – finishing 5th and qualifying for the domestic play-offs for European football.

Transfers 16/17

In his second season, we see another shift in losing dead weight, majority of the players simply is’t good enough or their contracts have run out. However, a difference from a season earlier is that Ten Hag also has sold some of their most important players – as they have done exceptionally well. In selling Ramselaar, Letschert and Boymans – they have generated over €9 million for those three players.

If we compare that to incoming players they have only spent €500,000 on new players (Van der Meer, Jensen), the rest came on a free, from the academy or was loaned from another club.

Another relatively successful transfer period and it resulted in a good position in the league as well. As they finished 5th in the 2015/2016 season, they now finished even higher on the 4th place in the table.

TACTICS

Before we move into the actual analysis of the tactics and style of play, I will place the analysis into context. I’m going to have a look at the 2016/2017 season for a number of reasons. It’s the highest finish in the league under Ten Hag, his style of play was seen throughout the squad and it was the season that attracted Ajax to his coaching style.

There are different components to analyse:

  1. Formation
  2. Defensive play
  3. Attacking play
  4. Counter-attacks
  5. Data
  6. The progress in the importance of full backs FC Utrecht -> Ajax

Formation

Ten Hag’s most used formations in this particular season were the 4-3-1-2/4-4-2 (51%), 4-3-3 (18%) and the 3-4-1-2 (10%). This depends on the opposition of course, but what’s good to understand is that he didn’t want the traditional Dutch school of attacking football. He wanted to maximise results and is very pragmatic in his approach in doing so, therefore being different to most coaches in 2015-2017 in the Netherlands.

This 4-3-1-2 can also be classified as a 4-4-2, depending on the position of Barazite. Often he played more like a #10 and closer to the strikers and it became a 4-3-1-2 with three central midfielders – with Brama a bit deeper. But when you play with a midfield square you Brama as the defensive midfielder and Barazite as the attacking midfielder, with Ayoub-Amrabat providing support in linking the defence to attack.

That 4-4-2 could also easily become a 4-3-3 with Barazite playing as a striker with Haller and Kerk on the flanks. The role of the two strikers is important for their dynamic play. While Haller is strong in the air and has good link-up play, Kerk is agile, versatile, and strong. These two players complement each other in attack and have enough ability to set up the midfielders as well.

Defensive play

So what does the defensive structure look like under Ten Hag’s FC Utrecht? I think it’s worth noting that he doesn’t do this in the traditional Dutch sense. He likes to keep it compact and we can see a few interesting things in how he sets it up. He only has the full backs in the wide areas and most of the player (6) are situated in the half spaces.

Full backs in wide areas, rest compact in central zones

In the image above you can see the defensive set up. One of the interesting parts is that the #10 will go into the striker position when FC Utrecht is in the pressing shape. In doing so it enables the #1o to help the two strikers who assume the winger positions without the ball and do the pressing as such. This means that the first pressing moment is done by a winger (Haller/Kerk) and Barazite will press the goalkeeper when he receives the ball. Ten Hag wants to press with three attackers. This means that one will press the central defender on the ball, the striker will press the goalkeeper and the third defender will remain close to the other central defender, to block the passing lane:

Pressing with strikers

In the image above you see how this has been done with the three attackers pressing. First, the winger presses the RCB who can only pass without risk to the keeper in his eyes because the passing lane is blocked to the RB. The defensive midfielder is an option, but he will be pressed too. As soon as the keeper has the ball, the striker will press the goalkeeper who can only play it long.

The two strikers do not only position themselves to be ready for the transition but they are actively involved in the defensive process. This means that attackers are expected to have defensive qualities as well under Ten Hag. They need to block passing lanes, track back and make sure to stand in between the central defenders and full backs. Ten Hag sees it as follows: you attack with the collective and you defend with the collective.

In general, Ten Hag didn’t press aggressively with Utrecht, but as soon as the opposition got into the position in the middle third, they would be marked closely and attempted to win the ball there as it gives advantages in transition (see counter-attack). Again, there is a vital role to play for the #10 in following a central defender who steps out. If a central defender moves up the pitch and attempts to progress via a carry or pass, the #10 Barazite will follow in order to limit the threat, while the two attackers will assume their original role.

Attacking play

For Ten Hag’s FC Utrecht there was one thing most important: attacking through dominance in the central zones. Bar the two full backs, everyone is in these central zones. The reason for that is that the LB and RB create more space for the central midfielders in the central zones, which is vital for the build-up.

Attacking options via central midfielders

So how does Ten Hag construct attacks using the left and right central midfielders? In this case the left central midfielder was Ayoub and the right central midfielder was Amrabat. There are two scenario’s in how they conduct the build-up and be as direct as possible.

The first one is where a central defender reaches Ayoub. In this case, left central defender Janssen, passes the ball to Ayoub who has assumed the position away from the half-space and come into the wide area. He stretches play, creating more space in the central zones in doing so. Then, he has two options. He can opt to play in the feet of Haller on the left side or he can play it in space where Kerk has to make a run. Haller needs to connect with other players to create a chance, while the option for Kerk will mean a shooting opportunity.

The second one is where a central defender opts for the right central midfielder option. This is less direct as the one mentioned above. The central defender plays to the defensive midfielder (Brama) who has dropped deeper. He will pass to Amrabat (RCM) and then he will connect with the attackers. Instead of playing it direct and straight, he will opt to play a ball behind the defence, utilising Kerk’s pace. At the same time, Haller moves to the far post in order to await a cross. The role of #10 is to cover the ground behind Kerk in terms of making sure transitions will be less dangerous.

In the image above you can see how the #10 Barazite acts with his through passes in case of ball possession in the final third. There are two different options. Important here is that Haller is not involved in the receiving of the through ball, as he isn’t equiped to make that run needed.

The first option is to pass in a straight line towards the penalty spot. Kerk will lose his marker and make a run inwards to get in the ideal position to shoot. The second option is to pass the ball to the right, where the RCM Ambarat will make a run between the defenders and enter the box from the right side. This could prove a good shooting opportunity, but also a good passing option as both Kerk and Haller will make a run to the far post.

Above you can see how the attackers react to cross from Amrabat from the right half space. Barazite willl move into the box on the right, while both Kerk and Haller will move to the far post zone, to attack the cross. Amrabat and Troupee stay on the right, to create space in the central zones – and there is where it has to happen for Ten Hag.

Counter-attack

In Ten Hag’s vision for FC Utrecht, he most likely wanted to regain possession in the middle third. In doing so, the positioning of the attacking midfielder(s) is absolutely vital going forward. In this case, it’s Barazite. He is instrumental in the counter-attack set out by Ten Hag.

In the image above you see the situation when there’s a counter-attack after regaining possession by the LB. Earlier we spoke about the 4-3-3 in defence, but as soon as the ball is further on the pitch – Barazite will drop deeper. After the ball is regained in the wide area by the LB, Barazite will move up the pitch and assume a position between the lines. In doing so he can adjust correctly and pass the ball to either striker. Because the strikers are playing in the half-space they can move to the wing or invert, which gives the defenders problems and FC Utrecht options on the break.

When the ball is regained in the middle third by the midfielders, everything is set to be played directly. This often occurs with Amrabat and he has two options, play it straight to Barazite or play it long behind the defence for Kerk. Again, Haller will make a run towards the far post to anticipate a cross.

Statistics

So how well did Ten Hag’s FC Utrecht score on the different statistics during the 2016/2017 season where they finished 4th? You can see that in the images below. (There is an issue with the quality of images showing on the website, click on image and open in another tab for higher quality)

In the graphs above you see how FC Utrecht scored in the shots per 90 metrics compared to the other teams in the Eredivisie 2016/2017. FC Utrecht scores 9th on the number of shots per 90. Below that you see the graph of expected goals per 90. FC Utrecht scores 4th in this metric, which does suggest they take most of their chances

But how do they do when shooting, what is the quality of those shots? In other words, what the expected goals number per shot taken?

You can see that FC Utrecht has the highest xG per shot in the Eredivisie. They are 9th on the shots per 90, but when they come in shooting positions – they do this in the most optimal positions/situations in relation to the other teams in the 2016/2017 Eredivisie. Ten Hag wants to use his attacking play to maximise the chance of scoring a goal. His idea was to limit the shots from outside the box and move into more certain positions of scoring – this resulted in the high xG per shot, as shown above.

On the goalscoring front, they were 5th with 1,54 goals per 90 – with only Feyenoord, Ajax, PSV and AZ scoring more per 90 minutes. It indicated they are doing very well in attack, making sure they are in the right positions and capitalising on those goalscoring opportunities.

How did Ten Hag’s FC Utrecht do in defence? We use the metrics of conceding shots, expected goals and goals to review this.

In the graph above you can see that has the 4th fewest shots against per 90 minutes. Only Ajax, Feyenoord and PSV concede fewer shots per 90. The strongest defences in the leagues conceded the fewest chances, but how many goals are they expected to concede? This measures the quality of the chances given away.

The quality of the chances conceded corresponds with the shots against per 90 minutes. FC Utrecht has the 4th fewest expected goals against per 90 minutes. This strongly indicates that their defence has been pretty solid. This also can be seen in the goals conceded per 90: 1,07. This was the 4th best in the data of the 2016/2017 season.

It’s interesting to see the data because they had a very good second season under Ten Hag. They were better than AZ and only the traditional top 3 (Ajax, Feyenoord, PSV) were better than this FC Utrecht side. A very impressive achievement.

Players’ reception of Ten Hag’s philosophy

When Ten Hag came into the FC Utrecht management, players were rather sceptical of his ideas. He changed a lot within the club, but most of all it was his way of coaching during training sessions. The obvious question was: what does this way of working do for us?

With the way of coaching, it can be seen as follows. Ten Hag uses a lot of moments during situations with a training session or drill to coach players. He often stops play and coaches what he wants to see and that will lead to friction sometimes. He has spoken about it in Dutch media and no player really likes it. But if the methods start to pay dividends in the games, players accept them because in the end, they want to win.

The reason why Ten Hag does this is that he wants the team to control multiple systems and that requires a lot of detail and attention from the coaching staff. But he has also admitted that too much of this way of coaching and the freedom of creativity can be lost – while that is very important for certain types of players.

The way he tries to avoid those problems is not to say what has to happen in the situations he stops play, but to ask questions. He does this to activate the brain of the players and that they are aware of the thought process behind it. Being transparent in why he demands these things of his players, is where players will accept it more.

For Ten Hag, it’s about giving context to every possible situation that can happen on the pitch and teaching the players about risk management. Because in the game, the players have to judge the risk of their actions themselves.

Players don’t need to enjoy everything they do on the training pitch, but they need to understand why they are doing it. That creates understanding and acceptance. For that to happen communication is vital and that’s what Ten Hag has done very well.

The evolution of Ten Hag’s full backs

Being FC Utrecht, there are always a few games per season that you will be the lesser team. The games against Ajax, AZ, PSV, and Feyenoord are very difficult matches and one can expect to drop points. Ten Hag has shown his pragmatism here and has employed a 5-3-2 on occasion to make sure defensive display is the priority.

When he made the step to Ajax this changed. You are expected to win everything and as a consequence, the view of the game will change as well. Ten Hag had to adapt to the stature and philosophy of Ajax and I think this is an interesting point as many critical pundits have shared their feelings about it. We have seen above that at FC Utrecht, Ten Hag wanted to create from the central zones and the positioning and actions of the full backs were in aid of that. They stood wide to create more space in the central zones, but this had to change at Ajax.

He was expected to play an attacking style of football that saw wingers in the wide areas as they play with three attackers. Keep the field wide to stretch the opponent and use the wingers to provide danger into the box. This also meant a change in the role of the full backs.

He had to adapt and there’s been a lot written already about it. I suggest you have a look at this thread by Jamie Scott. He analyses in great detail what Manchester United can expect from Erik ten Hag based on his Ajax tenure. Especially the (over) reliance on full backs is worth the read, as it’s something that’s different from his FC Utrecht period.

📌 Erik ten Hag to Manchester United [thread]:
– ten Hag’s Principles of Play at Ajax
– Strengths and Complexities of the System
– Suitability for the Premier League and United’s Squad pic.twitter.com/tfJO3paxDN— Jamie Scott (@JamiescottUV) March 22, 2022

FINAL THOUGHTS

Erik ten Hag came into international media due to his excellent European exploits with Ajax. But this wasn’t the beginning of his success. The promotion to the Eredivisie with Go Ahead Eagles, his successful spell with Bayern München II and of course his time at FC Utrecht, made him what he is today.

At FC Utrecht he has shown how to elevate a club from mid-table to sub top, whilst competing for European tickets as well. He has taken a squad, cut the dead weight and taken to the transfer market combined with academy players. His distinct style of play, his professional mentality throughout the whole club and consistency in performances – have formed him and prepared him for the Ajax job. The progression from FC Utrecht to Ajax is important to understand what he can do for Manchester United.

Sources:

Tussen de Linies
Voetbaltrainer
VI Pro

CRYSTAL PALACE AND THE ART OF THE LONG BALL

I have always been fascinated by the use of a long ball. In terms of using a long ball, it’s often regarded as a negative thing to do – or at least it has been for a long time. Now we have started to look a bit differently at the game in terms of attack and defence, which leads us to the fact that a defensive style of play isn’t negative football. It’s all about which principles you adhere to.

In this particular case study, I wanted to look at Crystal Palace. The reason for that is because, in the Premier League, Crystal Palace has the second number of long balls per 90 minutes.

Credit: Wyscout

As you can see in the image above, Crystal Palace has many long passes per 90 minutes – but are surrounded by teams who are battling against relegation. Solely based on this, the question remains: do Crystal Palace play conservative football and are they under pressure a lot, to maintain the long ball?

Obviously, the question above is generalised and not based on any evidence, but the interesting point still holds ground. What do Crystal Palace do in their game, that they maintain the long ball so much? To answer that in part, I’m analysing the long balls by the four players with the most long balls in the Crystal Palace’s squad:

  • Tyrick Mitchell
  • Marc Guehi
  • Joachim Andersen

These players are all defenders which makes it an interesting case, but we shouldn’t be biased or prejudiced. Defenders are more than just people who defend, they are players who construct attacks and lead the defensive organsiation. In that light, I have made the distinction between long balls that:

a) Strengthen the defensive organisation
b) Construct attacks

The analysis will be done by looking at a few examples of every player. The footage comes from Wyscout and has been taken from the platform prior to April 9th, 2022. Any results after that haven’t been included in this analysis.

Strengthening the defensive organisation

One use of the long ball can be to reorganise the defensive shape of the team. When a team is under the pressure from the opposition, this can lead to hazardous situations. One can be that the central defenders and or full backs are being pressed aggressively and their only way out is to play a long ball and regain their defensive solid positioning.

Another way is when there has been a counter-attack from the opposition and in order to regroup and make sure the rest defence is aided, is to clear the ball long and give the other players time to drop deep again.

In the three examples below we look at the three players in the defence of Crystal Palace, making sure the team has room, space and time to reorganise their defensive shape.

In the video above we see Tyrick Mitchell in the FA Cup game against Everton. Everton has the ball in the defensive third of Crystal Palace and are looking threatening to the defence. The ball comes to Mitchell’s feet who just gives the ball long into the high middle third. In doing so the accent of play goes to that area, the attackers drop deep and therefore the defence can reorganise. They go the most optimal position and move up the pitch, to maintain a higher line – as Crystal Palace is looking to be more attacking in this phase.

In the video above, you see Crystal Palace in their Premier League game against Arsenal. Marc Guehi is very comfortable at the ball – which we will touch upon in the attacking side of the long balls – and this can also be seen in this particular example. Whilst he has enough time to do something with the ball, he’s fully aware of the press Arsenal employs on him and chooses to go long in order to give the defence a breather.

Pressing isn’t only about the man who is on the ball, but also about the pressing that occurs in the passing lanes or passing options. In that regard, playing the ball long offers more stability in the back.

In the video above, we see Crystal Palace against Arsenal. While we have seen that Mitchell and Guehi have different ways of restoring defensive shape, Andersen is the most defensive-minded and less concerned with taking time.

He gets the ball in a tighter space from his teammate and has little time to think, as Lacazette presses him aggressively on that right side. He opts to shoot the ball long and high, giving him and his defensive teammates as much time to regroup. In doing so, it’s all about time and not about progression. And that’s the difference between Mitchell and Guehi. They opt to play the ball long but also use the time to maintain a higher position on the field.

Constructing attacks

In the image above you see two long balls often played by Crystal Palace: the ball across the wide areas by the full back to an attacker who moves wide. Or, the ball goes from one central defender to the wide-area with the attacker making that same movement. Other variables than portrayed, are of course also known to happen.

Constructing attacks from ball-playing defenders happens a lot with Crystal Palace. Full backs do make runs down the line, but the direct ability to play a long ball and instantly set up the danger in the attacking third, is where Crystal Palace has had success as well.

In the video above we see Crystal Palace in their game against Arsenal. Mitchell has the ball and is not pressed, which gives him the time to look for the run of a teammate. Crystal Palace want to utilise the wide areas and that’s the attackers make a movement.

In this case, Mitchell provides a ball to the left which is received by Crystal Palace and immediately goes into the attacking shape. While Arsenal defends the ball well, it’s this kind of playing long balls that can see Crystal Palace become dangerous within seconds.

In the video above, we see another video of the game Crystal Palace vs Arsenal. What Guehi excels in, is his ability to spot an attacking player, recognise the run that the attacker does and pinpoint the pass in that direction. That’s what he does here as well.

He has time on the ball, moves to his right foot and spots the run Zaha is making. His pass is into an area where Zaha has to go to as well, which makes the pass dynamic and keeps the attack alive if Zaha receives the ball well. He does and in doing so, the ball has just gone from defensive third to attacking third with one pass. A direct passing style of play caused Arsenal all sorts of problems.

Final thoughts
Football can be played in many ways. There is no right or wrong way to play football, but it’s important to illustrate that long passes can have different uses. While most people have claimed in the past that they are part of the defensive part of play, it’s important to stress that long passes or long balls are a sign of something else: the direct passing style of play.

Crystal Palace want to attack through their direct passing and choose to have as few passes as possible to get in that final third. This can be achieved through their long balls from the back by either the central defensive duo or the full back pairing.

In defence, it’s really important as well. Playing out from the back might be more aesthetically pleasing, but in professional football, it’s all about being effective. Playing the ball long can lead to satisfying attacking results, but it also gives the defence time, space and room to reorganise their defence and strengthen it.

TACTICAL ANALYSIS AZ – FEYENOORD 2-1

I love the Eredivisie with a passion, although I understand I’m a bit biased in my views on how entertaining it is. My club has played in and out of the Eredivisie, so it’s a kind of a mythical land to me personally. In this article, however, I will not look at that but focus on the game played between AZ and Feyenoord.

In the image above you can see the formations in the game AZ vs Feyenoord. What’s interesting is that AZ had a very compact 4-4-2 with Clasie and Midtsjø playing a bit deeper, while Karlsson and Sugawara acted as wide midfielders/wingers, who supported Pavlidis and De Wit. In defence the two lines of four players were solid and made to withhold any Feyenoord attack.

Feyenoord employed a 4-2-3-1 and opted for a distinctive difference between the attacking players and the defensive players. The double-pivot consisting of Hendrix-Kökcü is one of good ball-progression, which enables the midfield trio Sinisterra-Til-Toornstra to go more up the field, to aid Linssen.

In the pass networks of this game, you can see something similar going on. AZ’s midfield play close to each other and the strikers, while in Feyenoord’s network, the fullbacks play high and close to the wide midfielders/wingers. Two slightly different systems, but effective in making sure the opponents cannot progress in their favourite nature. AZ wants to block the flanks by making sure the full-backs don’t go too high, while Feyenoord want the double pivot to play higher up the pitch, to match the compact four-man midfield of AZ.

AZ’s attacking play

How does AZ construct its attacks? In the image below we can see how they start their attacks and how the defenders are positioned.

In the image above you can see AZ when they have recovered the ball from Feyenoord and are looking to start their attack from the middle third. Left-back Wijndal has the ball on the left and is making a run forward, while the central defensive duo and right-back Witry stay in their own half. Midtsjø and Classie play close to the defensive four because they just were in the defensive phase of the game.

Going forward, it’s the fullback’s intention to connect with the wide midfielder, in this case, Wijndal wants to connect with Karlsson. Which can be seen in the image below.

In the image above there are two distinct things happening. On the left side we see that Wijndal passes the ball to Karlsson on the flank and directly underlaps. His run follows the arrow and he goes to the empty space in the attacking third in order to deliver a cross into the box.

This is a good run from the progression of the attack, but this is only possible by the position of the two strikers. Pavlidis has dropped significantly and takes the attention of the double pivot, which means there is more space in the attacking third for the run of Wijndal.

Karlsson manages to give the through ball to the upcoming Wijndal and he comes in a very good position to give the cross. There are three different options. The first option is to cut it back and pass it to Pavlidis who gestures he wants to receive the ball. Secondly, he can give it to the near post zone where De Wit can connect with it. And, the third option is Sugawara – who comes from deep and moves to the far post.

Wijndal and Witry do this on some occasions, as you can also see in the image below, where the pass maps in the opposition’s half are illustrated.

Az loves to attack via the flanks and let the wide midfielders connect with the attacking fullbacks. In doing so, something is asked from the players. The fullbacks need to be able to deal with the pace and runs, while the wide midfielders should possess the qualities of a playmaker as we have illustrated here with Karlsson.

Feyenoord’s passing from double-pivot Hendrix-Kökcü

So, Feyenoord was the more dominant side in this game with 66,59% possession of the ball. But what did they do with it when they were on the ball? In the 4-2-3-1 Arne Slot employed, it was vital for the double-pivot to have good ball-playing abilities: Hendrix and Kökcü were tasked with directing the play with their passing. In the visual below you can see all the passes they made during this game.

In the image above you can see that while they both play in the defensive midfield role, they both have different tasks within the game. Hendrix manages to be the more defensive role and is less involved with passing. Kökcü is a lot more progressive in both his positioning and his passing. He wanders to the left and has many passes he makes in total, but definitely also many passes to the final third. One could say that Kökcü is instrumental in how Feyenoord connect the midfield with the attack.

Feyenoord’s solution to AZ’s defence

Feyenoord was struggling all first half how to deal with the way AZ was playing. The four-man midfield and compactness really helped AZ in the transitions and in the defensive phase of the game. With trailing 2 goals to 0, Feyenoord had to find a solution to break down AZ’s 4-4-2.

They were helped by the goal of Geertruida, which was basically gifted to them and gave them a confidence boost to tackle this problem.

The first thing Feyenoord did was utilising set pieces. Every set-piece play (corner, throw-in or freekick) is an opportunity to make a direct impact. Now, this is not something you can enhance during the game, but the intensity and enthusiasm in making the most of it was definitely felt.

The second thing Feyenoord did, was starting to use passing triangles combined with third-man runs. I will illustrate that below.

In the image above you see Feyenoord with three players on the right flank, but they are pressed by two players of AZ. In order to beat that press, you need to up the tempo and/or be well-positioned. In this particular case, you have Kökcu on the left, with Sinisterra in the middle and Pedersen near the line. As soon as Sinisterra has played the ball to Kökcü, makes a run forward – while Kökcü passes the ball to Pedersen. Pedersen will feed the ball to Sinisterra again, and in doing so, have beat the press and are in a good position to continue the attack.

In the image above, you can see the moment that Sinisterra moves to the open space in the penalty area and from there it’s about finding someone near the six-yard box. The way of using the triangles, combined with the third-man runs, lead to confusion in AZ’s defence and made sure Feyenoord came into that final phase of their attacking play. From the cross or cut back, the attackers could manage to become a threat in front of the AZ goal.

Shots

In the image above you can see how the shots were divided in this game between AZ and Feyenoord. While AZ were the better team in the first half, they had one major chance next to the two penalties. That’s why they mainly accumulated an xG of 2,38. Feyenoord didn’t have a penalty but scored a goal that had a high xG. Overall, Feyenoord has more shots but fewer xG per shot, as we can see in the image above.

Final thoughts

In aspects of the game, especially in the first half, AZ was better on the flanks. They used underlapping full-backs to support the attack while tasking the strikers with dropping once in a while. Feyenoord has troubles passing their way through the compact four-man midfield, but in the second half found a way to beat the compactness and press: using triangles with third-man runs. Feyenoord failed to score more goals, but that also was the consequence of rather solid defending by AZ in the penalty area.

*Telestrations were made with Keyframe Sports.

BARCELONA B 2021/2022: CHANCE CREATION FROM ZONE 14

I never thought I would write about Barcelona to be honest. So many people before have written about this club, but I thought that writing about their ‘B’ team would be quite interesting as they aren’t operating in a top 5 league, and it’s always good to see whether talents do well in a league that is full of senior players.

I will look more closely to how Barcelona B creates chances from zone 14 and I’m doing that by looking at video fragments of those chances in the 2021/2022 season in the Segunda Division B in Spain.

Zone 14

What is zone 14 and why is it important to many analysts? Spielverlagerung does explain it rather nicely:

“On a pitch divided into a six-by-three grid with a central strip as wide as the six yard box, the Zone 14, also called The Hole, has been classified as the rectangle which helps teams score more goals. Zone 14 is the zone located in the middle of the pitch immediately outside the opposing penalty area. During the 1990s and early 2000s, statistical data showed that successful teams such as the World Cup winning team of France or 1999 Champions League winner Manchester United had a better performance in Zone 14, as it was the key area which produced vast majority of passing assist. Until today, some prefer the concept of using Zone 14 as a target area in terms of build-up play, mostly denying the use of cross passes. According to various studies, the most effective way to use Zone 14 is to play a pass into the penalty area. Plus, the phase of possession in Zone 14 should not take longer than eight seconds.”

I like to look at zone 14 when I analyse teams. Not so much because I value zone 14 a lot, but I find it interesting to see which teams use that zone a lot and try to create goalscoring opportunities from there.

Chance creation: shooting

In the image above you see the pitch divided into 14 zones, which has been generated from InStat. In the current season, Barcelona B has created 82 chances, all of them in the final third. AS you can see chances have been created on the flanks, a stagger 71 chances within the penalty area and 7 have been created in that zone 14, we spoke about above. 8,54% of the chances were created from zone 14 and that’s what we are analysing in the next segment.

In the 3 videos above you can see how Barcelona B does shoot from zone 14. They often come in the situations by pressing the defenders, making sure that timing and place of the pressing is accurate, and regainin possession of the ball. In doing so they have 2-3 players in and around zone 14, which makes it easier to shoot from these locations. As you can see in the 3 videos above, the Barcelona outfit is quite successful when doing so in zone 14.

Zone 14 chance creation: passing

In the image above you can see the passes to the penalty area by Barcelona B per zone – this is a 14 zone grid. We see that the most passes come from the flanks, with 129 passes coming from the left and 102 passes from the right. As I’ve stated, I’m only interested in the zone 14 passes. In total there are 364 passes into the penalty area with 30 coming from zone 14, which is a percentage of 8,24%. Which is almost the same as the percentage for shots from zone 14.

What Barcelona B does very well in passing to the penalty area from zone 14 are two things. The first thing is that they want to dominate control of the ball in zone 14. They keep it in possession and try to play short passes within that zone to maintain control of the ball. The second thing they do well is that they try to look for that through ball or key pass that sets the attacking players up for a 1v1 or a good angle to shoot from. This isn’t always successful, but the intention is there and that’s why zone 14 can be very helpful in creating goalscoring opportunities.

Final thoughts

The main reason for creating this rather short article is to look at how Barcelona B does in zone 14 with chance creation. This is a very descriptive and quite obvious article, but it can also help in getting links. How do you use event data in combination with videos to analyse certain patterns of play? How do you contextualise and visualise chance creation?

JACK HENDRY – KEY PASS ANALYSIS

The Jupiler Pro League has established itself from a lesser-known league to a relevant league with huge talents, progressive clubs, and a ground for young prospects to develop themselves. In this article, I will look at one of those players that has grown in the league: Jack Hendry.

The player moved to Club Brugge this summer which sees the Scotsman be on the national top in Belgium and participating in the Champions League. In this analysis, we will focus on his key passing during the ongoing season.

I will use Wyscout data and video to assess how well Jack Hendry does perform in the 2021/2022 season so far. In the end, I will use video to look at some of their through passes in this season.

If we look at the progressive passes per 90, we see that Hendry has 5,78 progressive passes per 90 in the 2021-2022 season in the Belgian Jupiler Pro League. When we look at the passes to the final third per 90, we see that Hendry has 4,84 passes to the final third per 90. In terms of performances against his peers, he has average stats as a central defender, but he is definitely not the worst in terms of those metrics.

If we look at the key passes per 90, we see that Hendry has 0 key passes per 90 in the 2021-2022 season in the Belgian Jupiler Pro League. When we look at the through passes per 90, we see that Hendry has 0,28 through passes per 90. In terms of performances against his peers, he has below-average stats as a central defender. For a central defender that many passes forward and to the final third, his actual key passes are not included in this season – he didn’t attempt them according to Wyscout.

In the image above you Jack Hendry from Club Brugge, compared to central defenders in the 2021-2022 Jupiler Pro League. This shows us the rank of his key passing data compared to his peers. He scores way below average on most metrics, only three metrics are in the region of average: Assists per 90, xA per 90 and passes to the final third per 90.

Now I will look at the passes from the last 4 games Hendry has played in Jupiler Pro League to assess his passing qualities: Charleroi (A), OH Leuven (H), Anderlecht (A) and Antwerp (A).

These are the last four games played by Jack Hendry in the Jupiler Pro League with Club Brugge. These colormaps show us where Hendry operated in those fout games and give us a heatmap of the central defenders. As you can see in all of the maps, Hendry is a progressive central defenders who loves position himself high up his own half to progress the play as directly as possible.

This can also be seen in the passmaps of Hendry during those four games, which can be seen below:

You can see the passes conducted by Hendry in the games against Charleroi, OH Leuven, Anderlecht and Antwerp. You can see that he likes to pass to the right, especially to any right back making runs down the line or wide midfielder. He attempts to reach those players on the flanks and usually tries to attempt a progressive pass: the passes progress the play and it means that the ball will go from the defensive third to the middle third, initiating attacking sequences.

Video analysis

In the four fragments below you can see four different types of passes that Jack Hendry has made in the last four games. It illustrates the way he contributes to this Club Brugge side and where his passes come from.

In the video above you see Club Brugge in their game against OH Leuven with Club Brugge in possession of the ball. They are dominant on the ball and that means that their back four will have a high line. By doing so the quality on the ball of the central defenders need to be there. Hendry gets the ball in the middle third and his pass here isn’t progressive in terms of meters, but his pas leads to the next phase of the build-up: constructing the attack. That pass is positive in the sense that it doesn’t go to a left/right back.

In the video above you see Club Brugge in their game against OH Leuven with Club Brugge in possession of the ball. They are dominant on the ball and that means that their back four will have a high line. By doing so the quality on the ball of the central defenders need to be there. This is a similar kind of pass going forward, but Hendry immediately receives the ball back and looks for the long pass to the left flank in order to go the attacking third on the flank.

In the video above you see Club Brugge in their game against Charleroi. Again, Club Brugge is dominant on the ball and play with a high defensive line, which means that Hendry gets the ball in the middle third. In the aforementioned examples he progresses the ball through the central zones, but this time he progresses it via the flank on the right. This is a good pass, because it’s not sideways, but moves the play into the attacking third via his right back.

In the video above you see Club Brugge in their game against Charleroi. Again, Club Brugge is dominant on the ball and play with a high defensive line, which means that Hendry gets the ball in the middle third. This time Hendry is put under pressure by the opposition’s pressing, but he remains calm and still executes a pass through the central zones, which potentially can lead to another positional attack.

Final thoughts
Jack Hendry has moved to Club Brugge over the summer and some people have questioned his ability to keep up with the level that is asked of him. Looking at the data and video, one can say that he’s doing reasonably well so far, but he has not been outstanding – however, if his key passing can progress, he might be one of the better players for the club in the near future.

Case study Northern-Ireland: Roles in the 5-3-2 formation in U18’s

A few of you might know this, but I have done a year abroad in Northern-Ireland. Belfast to be more specific. While studying abroad I’ve learnt a lot about the history of the region I’ve been, the religious difficulties and violence, and about the customs of the specific area I was located. While I could talk about these things for ages, I wanted to talk about my experiences with Northern-Irish football. This is a football blog after all.

I’ve previously written about case studies in the Netherlands concentrating on inverted full backs, ball playing central defenders, zonal marking in set pieces, and the 4-3-3 & 4-2-3-1 formation. While I’ve finished the case study in the Netherlands, I wanted to have a look at Northern-Ireland as it has shaped me as a coach. In this analysis I will look at the 5-3-2 that was employed against a 4-4-2/

In this analysis I will focus on what I’ve observed in the games I’ve seen in the U18’s league. This might be different to what senior sides do and the decisions made in attack, defence and transition can therefore be different than what is best, but this analysis looks at what happened.

5-3-2
Formations are not set in stone throughout the match, but often are starting points at the beginning of a half or when a set-piece is taken. Formations are fluid as we can see in maps with average positions. The idea of position versus zones is a debate you can have, but in theory a 5-3-2 can broken down in the following: 5 defenders, 3 midfielders and 2 attackers.

Often a 5-3-2 is a defensive state and it become a 3-5-2, but in the games I’ve observed at the time, this was not the case. This was a 5-3-2, that changed a little bit during the attacking phase of the game, but it was no 3-5-2 with 5-3-2 in the defensive phase in the game and that has all to do with the roles of the lateral defenders.

Full backs or wing backs

In the image above you see a 3-5-2 formation with wing backs. These two players have a very specific role going forward and dropping deep. In defence this 3-5-2 become a 5-3-2 and in attack this become a 3-3-4 in most cases I’ve seen.

In the 5-3-2 I’ve observed there was always a back-five with an individual role of a full back to go high up the pitch into the middle third, but no higher than that. The rule in going foward was: only one of the full backs could higher up the pitch, the other would play deep – which in some case could result to a 4-4-2 in formation or 4-3-3 with a deep-lying #10.

Midfield trio

The midfield consists of three players. In the games I’ve observed there were two different scenarios:

  • Scenario #1: There was a double pivot of two defending midfielders with an attacking midfielder playing more advanced. This attacking midfielder had the role of a #10 and would play closer to the two strikers when the team was in possession and in the attacking third.
  • Scenario #2: There were two midfielder lying deep, but they were not a classic double pivot. The two deep-lying midfielders consist of a defensive midfielder + a central midfielder. That central midfielder moves along with the phases of play. In defence he plays deep and more defensively and in attack he moves to a more advances position, close to the #10.

In defence the double pivot would drop so that there would be a clear number of defensive-minded player. In reality there would be seven players defending with three attacking-minded players.

Strikers

Evidently this system plays with two strikers. In the images I’ve included in this piece, the strikers are not playing close to each other and have space between them. This is done intentionally as they were not classic strikers, but neither were they wingers. These players had the task to win the duels, hold on to the ball and move to a certain flank in order to create space in the middle and on the other flank. The other striker and attacking midfield could then move forward and create danger in front of goal. In this system, the two ‘strikers’ were identical in their role and in their style of play.

Another way of playing was when the two strikers played close to each other, but they had different qualities to bring to the game. There was one striker who was big, strong in the air and very good in holding the ball. The other striker was quicker, more agile and made more runs into specific areas to compliment the qualities of the first striker. This dynamic was supported by the attacking midfielder when he moved more up the pitch.

Allow freedom on the flanks

The main issue with the use of full backs instead of wing backs in the 5-3-2 is the freedom on the flanks. Because of the nature of the lateral defenders, pressing high up the opponent’s half or even in the middle third, is not really feasible. Thus, it is easy for the opponents to advance with wide midfielders and/or wingers. Because of the five-man defence they are dealt with quite easily, but it leaves the opponent too much freedom to dominate the game.

I gained valuable experience researching this system in Northern-Ireland. Like I said, it has shaped me as a coach and made me think of the benefits of a three-man central defence. Obviously there are flaws to this system and perhaps the use of wing backs or employing a 3-5-2 is essential, but it was great to see this being used in the U18’s.

*The tactical images are made with Tactical Pad, which gave me the freedom to alter the pitch just like I wanted to.

Case study: 4-2-3-1 formation analysis

My fourth and last case study in Dutch academy football concentrates on formations. More specifically, I’ve looked at two formations used in the U18’s of several clubs. This analysis focuses on the theory of what’s good and what’s not so good about the 4-3-3 formations and the 4-2-3-1 formations. In part II: 4-2-3-1

These two formations have been used the most by the teams in the U18 leagues I’ve observed and in this analysis I will focus on a few things:

  • The defensive role of the midfield: double or single pivot
  • The attacking role of the midfield: the number ’10’
  • Pressing from the front

Often formation is used by media and fans as something that is static, as if each players holds a specific position – but as you may have seen or know, they are rather fluid and change within the game. But the roles asigned to players in a system, that’s what’s important in a game.

In this analysis I will focus on what I’ve observed in the games I’ve seen in the U18 league. This might be different to what senior sides do and the decisions made in attack, defence and transition can therefore be different than what is best, but this analysis looks at what happened.

The 4-2-3-1

A 4-3-3 is the formation of the Dutch footballing DNA. Many academies have been drenched with the idea of a 4-3-3, but the 4-2-3-1 is being played more often nowadays. This has to do with the idea that the playing philosophy of the first team should reflect the academy and vice versa.

There is a back four and a low defensive bloc – which also can be described as the double pivot in midfield. These six player form the defensive side of the starting 11. The attacking midfield consists of three players with #11 and #7 having space in front of them and the #10 staying a bit deeper. In this system there is one striker, as you can see with the #9.

Looking back at the games I’ve seen, the double pivot has not only a role to play in defence, but also in attack. How? The double pivot consisted of two defensive midfielders or a central + defensive midfield combination (the central midfielder would have more defensive qualities than attacking). This double pivot makes it so that there are essentially six defensive players in the team and this enables the four attacking players to think more in attack.

These four players are not only tasked with attacking, but they are encouraged and allowed to express more creative freedom. When they lose the ball, there is a defensive bloc that will try to deal with it in transition, before the back four will be threatened by the opponent’s attack.

There a few things different in the games I’ve observed from the 4-3-3. In the image above you can see how the attacks are constructed in a way. The ball was often played from the central defensive duo to the defensive bloc/double pivot. They would have several options going forward, but they often picked out the wide attacking midfielders. The difference is that they are not real wingers in the sense of the 4-3-3, but are more inverted and this is the key.

The #11 and #7 receive the ball and move inside into the box, where they would try to create a chance for the striker via a through ball or, would shoot with from that position. But that’s not the only attacking role they play. In the case that the defensive bloc picks out a pass to the upcoming full backs – who have a slightly more attacking role in this approach – the full backs move into the wide area. The wide midfielders and the #10 all move closer to the box, resulting in the following situation:

  • #9, #7 and #11 in the box
  • #10 in zone 14

The full backs had two options going forward which would create a lot of threat. Option one was to swing the ball into the box via a cross, with three players trying to attack that cross in the air. Option two was that the full back would go closer to the back line and try to pick out the #10, who was moving forward from zone 14.

The 4-2-3-1 was very effective when the team went into transition from defence to attack and wanted to create a goalscoring opportunity quickly. They could take risks and be more direct, because of their ‘safety-net’ of the double pivot.

Like I said above, hwne the ball was lost – the first line of dence was the double pivot, but that didn’t mean that the midfield was lost. The formation shifted and although the double pivot had to deal with the threat of the opponent, the formation would then change into a 4-5-1 formation in most cases in order to create a numeric advantage in midfield.

You can see this in the image above. When for example #10 lost a all, #6 and #8 were tasked of stopping the opponent. At the same time the attacking midfielders would drop deeper and join the double pivot to create a five-man midfield.

The 4-5-1 doesn’t really differ too much from the 4-2-3-1 as a midfield, but the defensive bloc and the attacking midfielders are playing more compactly, which makes them stronger as a defensive unit. At the same time it’s easier when they are transitioning from defence to attack, to get back in the shape of the 4-2-3-1.

It’s a slightly different approach than with a 4-3-3 with more attacking threat created to central zones of the pitch rather than from the flanks. The involvement of full backs from the flanks creates a different dynamic though, but the idea of having a defensive and attacking bloc, sits very well with some of the teams observed in the Dutch U18’s leagues.

*The tactical images are made with Tactical Pad, which gave me the freedom to alter the pitch just like I wanted to.

Case study: 4-3-3 formation analysis

My fourth and last case study in Dutch academy football concentrates on formations. More specifically, I’ve looked at two formations used in the U18’s of several clubs. This analysis focuses on the theory of what’s good and what’s not so good about the 4-3-3 formations and the 4-2-3-1 formations. In part I: 4-3-3

These two formations have been used the most by the teams in the U18 leagues I’ve observed and in this analysis I will focus on a few things:

  • The defensive role of the midfield: double or single pivot
  • The attacking role of the midfield: the number ’10’
  • Pressing from the front

Often formation is used by media and fans as something that is static, as if each players holds a specific position – but as you may have seen or know, they are rather fluid and change within the game. But the roles asigned to players in a system, that’s what’s important in a game.

In this analysis I will focus on what I’ve observed in the games I’ve seen in the U18 league. This might be different to what senior sides do and the decisions made in attack, defence and transition can therefore be different than what is best, but this analysis looks at what happened.

The 4-3-3

When one of the teams played a 4-3-3 in the U18 leagues, it was constructed as in the image above. A back four with one defensive midfielder (#6) and two midfielders higher up the pitch. Usually this was one central midfielder and one attacking midfielder. On top there was an attacking trio of one striker and two wingers, who usually made runs down the line and delivered crosses to the striker and the attacking midfielder moving up the pitch.

With the 4-3-3 formation you make use of the wings from your wing-attackers as you can see in the image below. The wingers move into the white positions on the wing and are tasked initially with providing crosses into the box, where the number 9 is moving towards.

But that is not their only task. They are trained and have been instructed to look for the attacking midfielder(s) entering the zone just behind the box, also know as zone 14. This is a position from where a lot of goalscoring threat is created via through passes or shots.

In this case the number 10 is very active and committed to be involved in the attacking play of the side with the possession of the ball and the number 7 is a bit more conservative in the case possession is lost and the transition from attack to defence happens.

Now attacking via the flanks can be a great threat to the opponent’s goal, but can give disadvantages as well. When the wingers are very well defended, it can leave the striker to be isolated and he has no support. The number 10 in this case won’t make the run forward, but makes himself available to receive a pass.

The wingers also need to be very aware of their defensive positioning: blocking pass lanes and trailing back. If they don’t do that, the opponent’s full backs have a lot of space to progress into the middle third of the pitch.

Illustrated in the image above is how the attacking midfield acted in a scenario when the ball was with the team analysed. In this 4-3-3 there was one defensive midfielder or a single pivot, who was tasked with the defensive duties and acted as the defensive unit with the four-man defence.

The 4-3-3 does well with the ball because of their presence in the central zones of the pitch and can translate that into dominance. But also in in defence, this formation provides an advantage with 3 midfielders, they defend the central zones of the pitch well and its difficult for the opponents to progress in the middle. And, when the opponent wants to progress via the flanks, they can usually only use one flank – as the other one can be pinned by one of the midfielders.

Talking about defence, a 4-3-3 in defence usually switched to a 4-4-2 in these games observed. This also can be seen in the image above. This makes the defensive block stronger, but in transition from attack to defence there is a big risk: when they play with one defensive midfielder, that player has to be disciplined in his positioning – when he is pulled away from his position, it opens space in the middle and that can lead to dangerous situations in the defensive third.

The 4-3-3 changes into a 4-4-2 in defence and what I’ve seen is that the two strikers in this formation (one striker and one winger) press the defence together. The four-man midfield rarely presses before the middle third and when they do, they do it as a unit.

It was a very interesting to see how a 4-3-3 moved and changed within different phases of the game. The U18’s are very close to what senior sides decide on the pitch, but the order of things is not always correct.

*The tactical images are made with Tactical Pad, which gave me the freedom to alter the pitch just like I wanted to.